Questionmark OnDemand Scheduled Maintenance 20 April 2024 09:00-15:00

Questionmark will be carrying out scheduled maintenance on Saturday 20 April between 09:00 and 15:00.

The purpose of the maintenance is to deploy system updates to ensure the ongoing reliability, security and up time of the platform.

During this time users may experience service disruption. We apologise for any inconvenience caused.

If you have any questions, please email digital-education@bristol.ac.uk

Questionmark OnDemand Scheduled Maintenance 16 March 2024 09.00-1500

Questionmark will be carrying out scheduled maintenance on Saturday 16 March between 09:00 and 15:00.

The purpose of the maintenance is to deploy system updates to ensure the ongoing reliability, security and up time of the platform.

During this time users may experience service disruption. We apologise for any inconvenience caused.

If you have any questions, please email digital-education@bristol.ac.uk

Recent updates to Padlet

Padlet has recently introduced a number of new features that can be used in Teaching and Learning. We have noted some below that could be of particular interest:

Breakout links

Breakout links allow you to share access to only one section of your Padlet, meaning that each group can see only their own section. This can be done in the Share panel – see our Padlet guide for further information.

Sorting posts

Posts can now be sorted by date, reaction score, alphabetically, randomly or manually. This is done in the ‘Layout’ section of the Settings.

I can’t draw

Padlet now has the ability to add AI-generated images to a Padlet, helping to boost creativity and act as an icebreaker. This can be found on the post composer. 
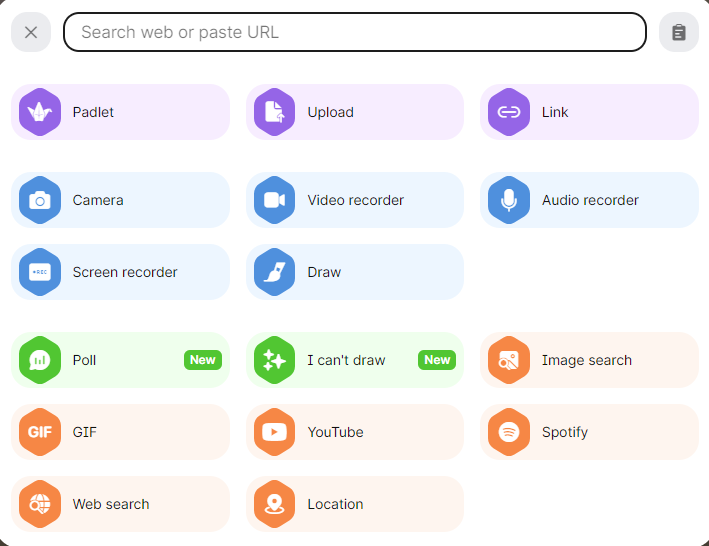
Polls

Basic polls are now available within Padlet. The results will be available to all users after voting.  Polls can be combined with the slideshow feature.  This can be done by opening the post composer and selecting the Poll option from the content picker.


Submission request links

Submission request links ask a visitor to submit a post before they are able to view the rest of the Padlet. This is done via the Submission request link on the Share panel. Learn more about this on Padlet’s blog.

Post fields customisation

You can now add custom text fields into the post composer so that visitors will see them when they are adding posts. This can help ensure that they fully understand how a question should be answered, or provide useful prompts to help them reflect. See our Padlet guide for further information on this.

To view Padlet’s full list of updates, visit their blog or click the ‘announcements’ feature on the home page of Padlet.

If you have any further queries about using Padlet, please email digital-education@bristol.ac.uk.

Upcoming Talis Aspire Reading List LTI upgrade

Due to an upcoming depreciation of the current mode of creating a link to Talis Reading lists we will be upgrading to the Talis Aspire Reading List LTI in the week commencing 29th Jan. This will involve a slight change in the way you set up and access the reading lists within your course.

Currently you can add a reading list as a tool link within the course menu or as an item link within the content area, both with the link title “Resource List” These two options will continue but with a change of title to “Talis Aspire Reading List”. The content area link will move from the content Tools menu to the Build Content menu.

The current content area links

The updated content area link.

All existing resource links will continue to work once we have moved to the LTI connection.

If you have any questions, please email digital-education@bristol.ac.uk.

Getting Re/Play ready for Teaching Block 2

Re/Play As we enter 2024 and approach the start of TB2, we wanted to highlight how to get the best from Re/Play content that has been copied into Blackboard courses from previous years. During 2022 and 2023, we updated the way that Re/Play presentations are added to Blackboard and, as a result of that, content that was added prior to 2022 will not work for students when copied into new courses.

As part of your content preparation, we would recommend checking your Re/Play presentations and updating them where needed. If a presentation does not have the orange play icon, but has either four orange dots or a green play icon, it will need replacing.

To replace a presentation:

  1. Log on to Blackboard.
  2. In your Blackboard course, click on Build Content and Item or Blank Page (or edit an existing item).
  3. In the Blackboard editor, add any descriptive text required to support the presentation, position the cursor where you wish to add it, then click the ‘⊕’ button in the editor menu bar (if the button is not visible, click ‘…’ to expand the bar.)
  4. Choose Re/Play Content from under Additional Tools. If the presentation you want to add is already on Re/Play, in this Add Video section you can select it. If you can’t find it, use the Filters box to narrow down your search. You can filter by several parameters. First check for ownership – whether you created the video or if it was shared with you. Then you can filter by how the recording was created. Mediasite recorder is the in-room box for lecture capture, Mosaic (video showing installation and use) is the software you can use to create ad hoc recordings, and Media Upload is where you have manually uploaded a file from your device.
  5. Then select Embed Video.

For further support, please see our Re/Play guidance.

Turnitin AI writing detection scores in December and early January

There was a temporary disruption in access to Turnitin’s AI writing detection tool between 1 and 5 January, which has now been resolved. Submissions affected by this issue will need to be re-submitted to receive a report. Instructions on how to resubmit can be found below.

We appreciate your patience and understanding and apologise for any inconvenience this may have caused. Please email us at digital-education@bristol.ac.uk if you have any questions regarding the AI missing scores.

How to regenerate the AI scores when needed

Step 1. Create a hidden Turnitin submission point

Create a content area which is hidden from students in your course:

  1. Ensure that Edit Modeis On.
  2. Move your mouse pointer over the + symbol above the course menu and select Content Area. Type in a name for the area (eg Turnitin hidden).
  3. Leave Available to Usersunticked and click on Submit.

Add the Turnitin submission point in the hidden content area:

  1. Click on the hidden content area in the left menu.
  2. Expand the Build Contentmenu and click Turnitin Assignment (LTI). At this point you will go into the Turnitin interface.
  3. Enter the Assignment Title (eg Turnitin checks). Add a point value.
  4. Set start, due and feedback release dates.
  5. Click on Optional Settingsto set Turnitin options.
    1. Make sure Submission settings are set to Do not store the submitted papers
  6. When finished, click on Submit.
  7. Click on the arrow next to the submission point you have just created and make unavailable. This will ensure if folder becomes visible students will not be able to access the Turnitin submission point.

Hide the Grade Centre column for the Turnitin assignment from students:

  1. In the Control Panel, click on Grade Centre, then Full Grade Centre.
  2. Find the Turnitin submission point column and click the arrow next to the title.
  3. Click Hide from Students (on/off). A red diagonal line through a circle should appear next to the name to indicate that the column is not visible to students.

Step 2. Download original assignments from Turnitin

  1. Access the original Turnitin submission point.
  2. In the Assignment Inbox, sort the submission by Uploaded date.
  3. Identify the assignments that did not get an AI writing score (if submissions are anonymous, you will need to reveal the author of the paper). Select the papers you have identified by checking the boxes in the first column.
  4. Click on Download Selected and choose Original Files. A ZIP file containing the selected papers will download.
  5. Unzip the folder and make sure you can associate the downloaded files with their author, by renaming the paper using the student number.

Step 3. Upload the assignments to Turnitin

  1. Open the hidden Turnitin submission point that you have created.
  2. Click on the Submit on behalf of student menu and find the student you would like to submit on behalf of.
  3. A message will appear asking you whether you would like to proceed? Click on Continue.
  4. Choose the file corresponding to the student.
  5. Click on Upload and Review and in the preview page make sure you are uploading the correct file.
  6. If you have confirmed that the uploaded file is correct, then click on the Submit to Turnitin button.
  7. Repeat step 3 for each file you need to upload.

Step 4. AI and similarity scores

Please keep in mind that the intention of this guide is to regenerate the AI writing score. Please refrain from focusing on the similarity score, as it will return a high similarity since it will be compared against the originally submitted file.